
Sunday, August 30, 2015
Friday, August 28, 2015
Kandisnky Line Paintings
Students are being introduced to famous artist, Kandinsky (Wassily Kandinsky) and learning about the types of line he used in his paintings.
Kandinsky is a Russian Painter (1866 - 1944) who was famous for his abstract paintings.

I am showing students a picture of his painting, Composition II, and we are discussing what we see. It's amazing so far to hear so many different responses to what the children see when they look at his painting. This is how I introduce abstract art to the children. I tell them that everyone might see something different in the painting, but everyone has a right answer; that's the cool thing about abstract art.

I am asking the children,
"What color are the lines Kandinsky painted?" (black)
"What did he paint around the lines?" (rainbows of colors or they can name the colors they see)
Children are creating their own Kandinsky inspired paintings; drawing black lines and painting rainbows of colors around the lines.
The lines taught are: up-and-down, side-to-side, dotted, zigzag, curvy, bumpy, and loopy.
This project will take us two art classes to complete.


Kandinsky is a Russian Painter (1866 - 1944) who was famous for his abstract paintings.
I am showing students a picture of his painting, Composition II, and we are discussing what we see. It's amazing so far to hear so many different responses to what the children see when they look at his painting. This is how I introduce abstract art to the children. I tell them that everyone might see something different in the painting, but everyone has a right answer; that's the cool thing about abstract art.
I am asking the children,
"What color are the lines Kandinsky painted?" (black)
"What did he paint around the lines?" (rainbows of colors or they can name the colors they see)
Children are creating their own Kandinsky inspired paintings; drawing black lines and painting rainbows of colors around the lines.
The lines taught are: up-and-down, side-to-side, dotted, zigzag, curvy, bumpy, and loopy.
This project will take us two art classes to complete.


A little announcement...
I cannot hide the bump any longer, mostly because I have run out of baggy, flowing tops. Baby is due March 11th. My husband, daughter and I are very excited!

Tuesday, August 25, 2015
Sensory Strategies from our OT
Simple
Sensory Strategies for Classroom Teachers, but if you see needs at home, you can do this too.
It seems each year we have more and more
otherwise “typical” children in a classroom experiencing sensory processing or
sensory modulation type concerns. These children are not able to organize and
respond appropriately to the vast amount of stimulation entering their neurological
system in a classroom environment. Sensory integration or the ability to
respond appropriately is important for all activities a child engages in,
especially participating and being available for learning in a classroom
environment. When a child’s sensory system is not regulated we may see
behaviors such as hyperactivity, poor attention, low arousal/energy, emotional
outbursts, or inappropriate social skills. These children are often viewed as
unmotivated, disruptive, or misbehaving. In a child with sensory processing
disorder these responses are neurological in nature and are direct responses to
the sensory input (light, sound, tactile, olfactory, vestibular, and
proprioceptive) and until the input is regulated the output (or behavioral
response) will continue to be the same. It is important for teachers to be able
to recognize and implement sensory strategies so that the classroom can be a
successful place for all children. It is also important to understand that
young children all develop at different speeds and sometimes providing simple
strategies make the world of a difference and that does NOT necessarily mean a
child has Sensory processing disorder rather it just may be an immature sensory
system.
Simple solutions for supporting these
children in the general education environment:
- Do you have a child that wiggles and moves in their chair or on the carpet?
- Try a seat disc -an air filled chair pad that allows the child to continuously receive vestibular input without being disruptive in class.
- Try having the child sit on a ball chair to allow vestibular input and increase attention
- Try having the child engage in heavy work activities prior to work time (see ideas below)
- Move stacks of books
- Deliver items from one classroom to another place in the building (especially if it requires carrying something and climbing stairs)
- Stack items, such as reams of paper, books, or storage bins
- Erase blackboards and whiteboards
- Move chairs or tables, put chairs on top of tables at the end of the day and take them down at the beginning of the day
- Wash desks or cafeteria tables
- Set up and put away folding chairs and tables
- Carry bins of lunchboxes into and out of cafeteria
- Empty wastebaskets, sweep,
- Sharpen pencils with an old-fashioned, crank pencil sharpener
- Assist gym teacher or playground supervisor with taking out and putting away equipment such as bags full of balls, mats, scooters, etc.
- Do laps around the gym or playground
- Climb stairs
- Cut cardboard and heavy paper card stock
- Do pushups against the wall
- Do chair pushups (holding the chair on either side as you sit, then pushing up to lift the body)
- Bounce while sitting on an exercise ball (loose or in a holder)
- Hold open heavy doors, or open them for individuals entering or exiting the buildingPush or drag boxes, carts, or furniture across carpeted floor.
- Do you have a child that has trouble keeping their hands still or seems to be day dreaming during whole group instruction? Do they have trouble completing independent work?
- Try placing a small strip of adhesive Velcro under their desk to allow them to touch and pick at it during whole group instruction which will increase attention to task while decreasing the child’s need to fidget and touch those around them.
- Give the child a stress ball or fidget to hold onto at carpet time.
- Allow the child to chew gum or suck on a mint during group instruction which is proven to increase attention.
- Allow the child to have a water bottle at their desk with a straw or a sport top (similar to Gatorade sports bottles) sucking will promote attention by calming the nervous system.
- Allow the child to have crunchy snacks prior to completing independent work (pretzels, carrots, apples)
- If there are no allergies try using a lavender or peppermint aromatherapy in the room to promote calm and attention.
- The mouth is an organizing center. Think of a baby and how sucking on a pacifier or a bottle can be very soothing and self-regulating. When packing lunch encourage parents to send in a combination of crunchy and chewy snack items. Also send in a large straw, rather than a spoon, to use to eat their apple sauce or yogurt. Chewy foods provide great oral proprioception. Chewing gum during instructional class time if the school allows can be very effective too. Crunchy foods like carrots, apples, hard pretzel or think of items that the child really has to really bite and chew and that won’t easily dissolve in their mouth. The crunchier or chewier the more sensory input the child will receive.
- Do you have a child that chews on their clothes?
- Have the child wear a braided sports necklace. This will look typical and give the child something firm to chew on while absorbing saliva
- Allow the child to chew gum during certain parts of the day when the chewing occurs
- Encourage the child to bring in crunchy or chewy snacks to provide the proprioceptive input
- Allow the child to keep a water bottle with a straw at their workspace
- Do you have a child that cannot hold the pencil with the correct grip?
- Tripod grasp – when the thumb, index and middle finger support the pencil while the ring finger and little finger are bent and rest comfortably on the table. Other grasps are also efficient patterns for children and you should only be concerned if their grasp is affecting their handwriting or they are experiencing pain. An inefficient grasp pattern means children typically write slower, use full arm movements instead of defined finger movements and/or fatigue easily.
- Holding the pencil correctly:
- Mark the pencil with a dot or sticker on each side of the pencil barrel across from another for placement of the thumb on one dot and the index on the other and pinches the pencil.
- Make an “O” with the thumb and index and pinch the pencil and tuck the other fingers into bed.
- Hold something small with the 4th and 5th fingers in the palm so the child does not put these fingers on the pencil (cotton ball, eraser, small ball, marker cap…)
- Pick up small objects with a mini tool (see below) while holding an object with their 4th and 5th fingers
- Tweezers, tongs, strawberry hullers to pick up pom poms, erasers…
- Tape or rubber band the end of the pencil to visually cue where to hold the pencil.
- Only give the child small writing tools (short pencils, crayons etc. no more than 2” long, but smaller is better) because they can only fit three fingers on a small writing tool.
- Use a slant board or large 3 ring binder to encourage wrist extension and typically decreases the 4 finger grasp and facilitates the open web space (the “O” position).
- Practice 3 finger activities:
- Pinch clay, plah doh, silly putty
- Pinch clothes pins
- Finger strengthening activities (See fine motor list)
- Lay on the floor to complete simple writing activities to provide stability to the shoulder area and encourage the child to move their finger muscles and not their entire arm/shoulder
Nicole Pfirman, M.Ed., OTR/L
Melissa Edkins, M.Ed, OTR/L
Monday, August 24, 2015
Monday Rotations
Monday rotations are quick, shorter art classes and for the next two Monday's and today, children are finishing their collage art and being introduced to art centers. Art centers are: tangrams, color blocks, unifix cubes, books, drawing, pattern clips boards, and popsicle stick creations. The centers are provided when children are finished a few minutes early with their art and have made sure they worked their hardest. The book center and drawing center are open to everyone and the rest of the centers allow three students at a time to work together. There will always be enough options so all children can participate if time allows. In a couple of months I plan to add a rubbing plates center and play-doh center.
 I still need to make the cards for the popsicle stick creation center. Children will look at the board each week to see which center will be available for that day, if any.

 The center tubs are on the 2nd shelf. The drawing center is to the left; the red basket holds drawing paper.
I still need to make the cards for the popsicle stick creation center. Children will look at the board each week to see which center will be available for that day, if any.
 The center tubs are on the 2nd shelf. The drawing center is to the left; the red basket holds drawing paper.
 Tuesday, August 18, 2015
Kindergarten Collages
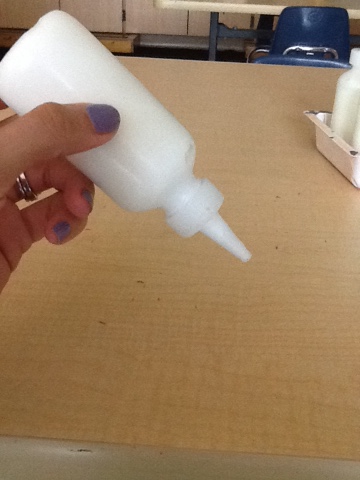
Yay! Specials teachers resume a normal schedule this week. I am very excited to see your child for the 2nd time and on their original art day AND for 30 minutes!!! This week will be pretty basic and a nice no-fail art lesson. The children will be introduced to the word COLLAGE. I will tell students that a collage is art that is created using a variety of materials and glue. They will get to use our special art room glue (which is in a special bottle and is "super sticky") The glue is really just Elmer's Glue in a special bottle, but telling the children the glue is very special art glue gets them more excited. :-)
*** A picture of our glue bottles are below and the proper way to hold the bottle.
I explained how the glue bottles are already open, so there isn't a need to twist the cap, etc. When we use glue in the art room we say: JUST A DOT, NOT A LOT! Most of the pieces being glued down only need 1 dot of glue, with the exception of the popsicle sticks which need 3 (one on each end and one in the middle).
The children can use feathers, foam shapes, popsicle sticks in two different sizes, scrap decorative paper, sequins and wood shapes to create their collage.
Sunday, August 16, 2015
First few days of school...
The schedule for specials was different than the rest of the school year. We basically had our Monday rotation schedule Wed., Thurs., Friday and Monday. For example, Wed. and Thurs. I had my week 2 classes, Friday saw week 3 classes and Monday I will see my week 1 classes. The schedule was like this so that each specials teacher could see every student in the first few days of school. Tuesday we all start the normal routine schedule.
What did your child do in art the first day? Since this was the first time I met your child, I taught them a couple standard procedures when arriving to art.
1. I will always wait at the door for them to arrive.
2. I will invite them to walk in and have a seat on their own square on the carpet. (The carpet is made up of 5 columns of squares: red, orange, green, blue and purple)
3. After children are seated in a square, we will read a message on the easel. The message will tell your child what they will be learning in art that day.
4. Your child found out which table they will sit at during work time.
5. I introduced the bell. When I ring the bell 1 time, children will freeze and put their hands on their head. I will then give clean up directions/reminders and then will ring the bell 2 times. When the bell is rung 2 times, children can unfreeze, take their hands off head and start cleaning up.
6. Children will remember to push in their chair and line up on the black line. We will count down from 5 to get us ready for the hall. When all voices are off and eyes looking my way, I will open up the door for their classroom teacher, which will then invite them out of the classroom.
In between learning procedures, I read the book, "Beautiful Oops" and we discussed how sometimes mistakes happen. I told the children that I don't like to call things mistakes. Instead, I like to call them beautiful oops or happy accidents because we can almost always fix it. I reassured the children that my job is to help them be successful in the art room especially when something can be difficult.
I also had the children draw a family portrait. I am going to save these drawings until the end of the school year, where the children will create another one and we will glue them next to each other. It will be amazing to see how much they grow this year in their art skills.

Thursday, August 13, 2015
Letter passed out at Orientation
I hope you all had the chance to read our orientation letter. Classroom teachers emailed it also. A couple important things:
1. Please provide an art shirt or smock for your child to wear. He/she will keep it in their backpack on non-art days so it is always with them. Classroom teachers prompt and remind the children to put on art shirts before leaving the classroom.
2. Some materials do stain. I do use tempera paint and the bottle says soap and water cleanup, but please try to be mindful of what your child wears on art day.
3. Your child won't bring home art right away. We paint and use glue a lot in the beginning of the year which needs appropriate dry time. I also like to look through the art and hang it on bulletin boards.

Monday, August 10, 2015
Orientation
All specials teachers at MECC had to split up shifts for our orientation booth in the cafeteria. Unfortunately, only 2 specials teachers per shift. Therefore, you and your child might or might not meet the kindergarten gym teacher, music teacher or myself during scheduled kindergarten times.
Kindergarten specials created a 1 page document for you to pick up in the cafeteria giving a quick explanation of our special. My primary communication with each and every one of you will be this art blog, unless I need to contact you for a specific reason or vice versa.
Please don't hesitate to email me with questions or concerns.
Vardas@masonohioschools.com
Looking forward to a spectacular year with your child!!!
Subscribe to:
Posts (Atom)